
Shared Storage Options in Azure: Part 4 – Azure NetApp Files
Contents
Welcome to Part 4 of this 5-part Series on Shared Storage Options in Azure. In this post I’ll be covering Azure NetApp Files. We have talked about other file-based shared storage in Azure already with SMB and NFS on IaaS VMs in Part 2, and again with Azure Files in Part 3. Today, I want to cover the last technology in this series – let’s get into it!
- Part 1: Azure Shared Disks
- Part 2: IaaS Storage Server
- Part 3: Azure Storage Services
- Part 4: Azure NetApp Files
- Part 5: Conclusion
Azure NetApp Files:
Azure NetApp Files (ANF) is an interesting Azure service, unlike many others. ANF is actually first-party NetApp hardware, running in Azure. This allows for customers to use the enterprise-class, high-performance capabilities of NetApp directly integrated with their Azure workloads. I will note that you can also use NetApp’s appliance called the NetApp ONTAP Cloud Volume, which is a Virtual Machine that sits in front of blob storage which you can also use for shared storage, but I won’t be covering that here as the ONTAP volumes aren’t first-party Azure. There are however, along with ONTAP, a number of great partner products that run in Azure for these type of storage solutions. Check with your preferred storage vendor, they likely have an offering.
Before we jump into it, I’ll note that there are different configurations or operations you can do to tune the performance of your ANF setup, I won’t be going into those here but will be writing another post at later time on performance benchmarking and tuning on ANF.
Initial Configuration:
Azure NetApp Files is a bit different from what you would expect with Azure Files, so I’m going to walk through a basic setup here. First of all, ANF currently requires you to be whitelisted for ANF use, to submit your subscription you’ll need to use this form.
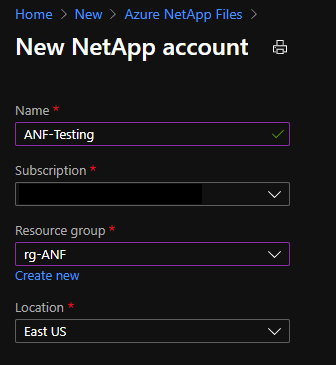
After you’ve been whitelisted, head into the portal and create an Azure NetApp Files Account.
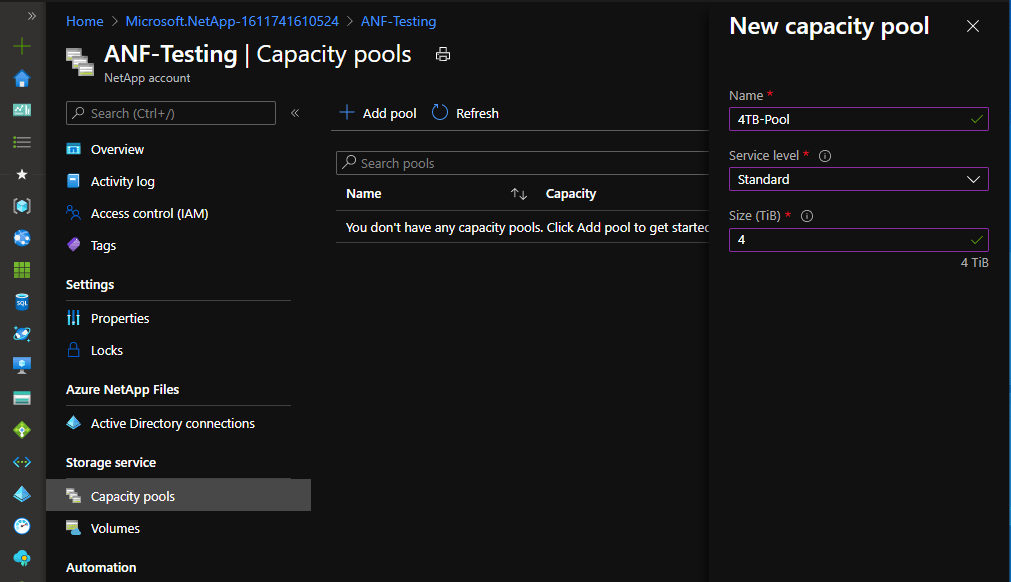
After it’s created, the first thing you will need to do is create a capacity pool. This is the storage from which you will create volumes later in the configuration. Note: 4TB is the smallest capacity pool that can be configured.

I’m using an automatic QoS type for this capacity pool, but you can read more about how to setup manual QoS. What is important to choose here is your service level, this cannot be changed after creating the capacity pool. I will talk more about the service levels later in this post.
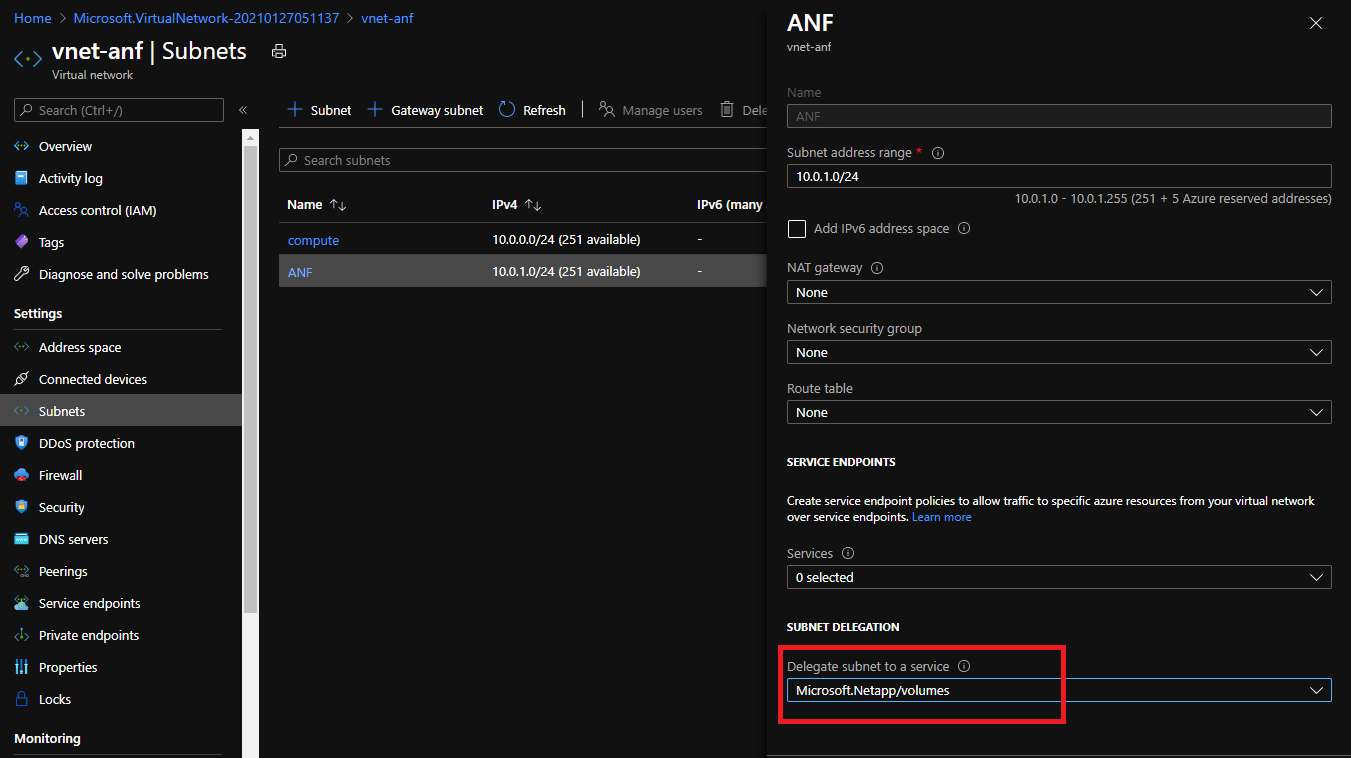
Later on I’m going to be using both and NFS and an SMB share. To use an SMB share with Kerberos authentication you will need virtual network with which to integrate ANF and your source of authentication. I’m going to create a virtual network with two subnets, one for my compute and one for ANF. The ANF subnet needs to be delegated to the Azure NetApp files service so it can leverage that connection, so I’ll configure that here as well.

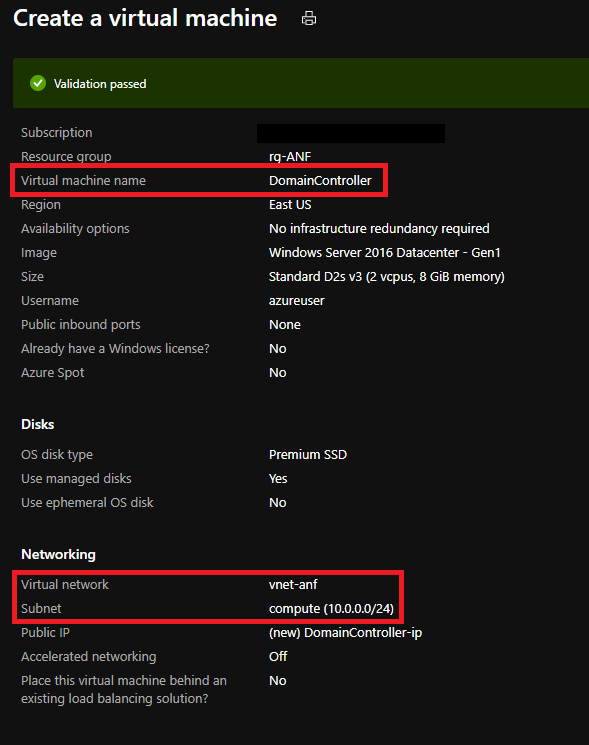
Now that I’ve setup the network I’m going to create my compute resources to use in my testing environment. This will be comprised of the following:
- Domain Controller
- Windows Client
- Linux Client
- Azure Bastion (used for connecting to those VMs)
I’ll use the Windows client to test the SMB share, and will test the NFS share with the Linux Client.
Domain Controller
Azure Bastion

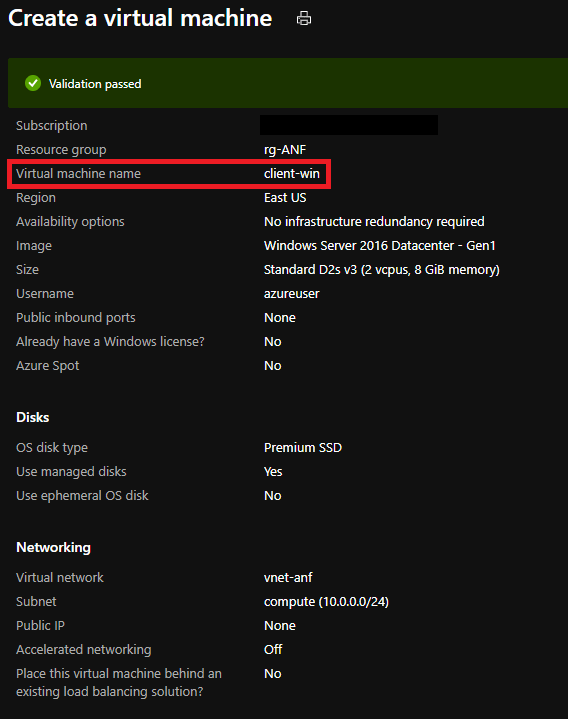
Windows Client
Linux Client

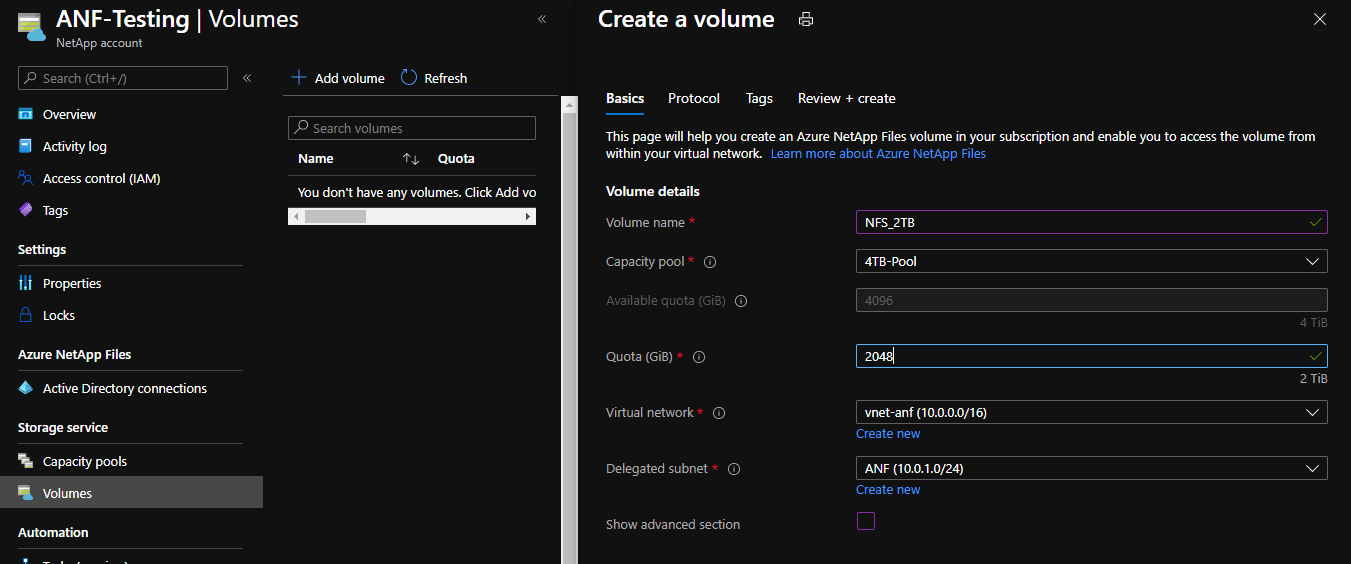
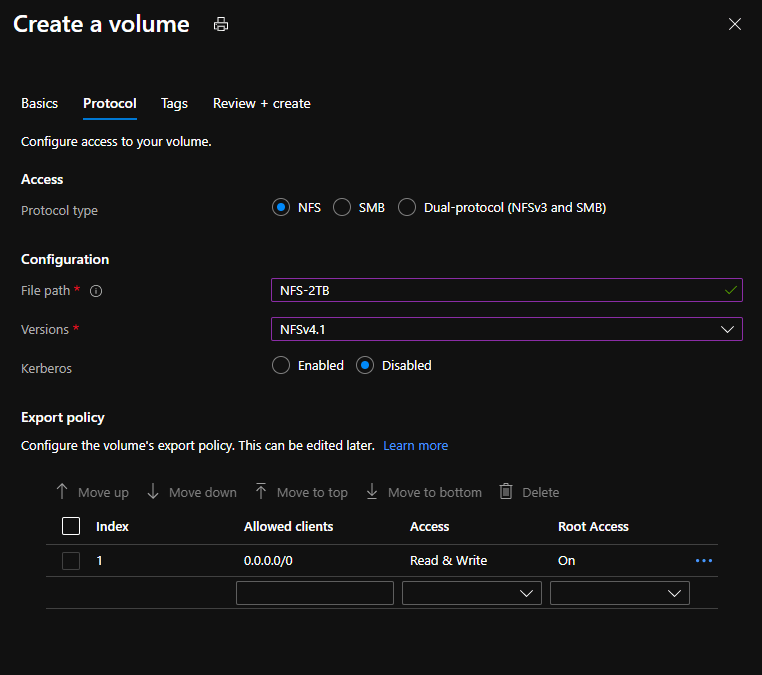
Now that those compute hosts are all being created, I’m going to go create my NFS volume. I initially created a 4TB capacity pool, so I’ll assign 2TB to this NFS volume for now. I’m going to use NFS 4.1 but won’t be using Kerberos in the lab, my export policy is also set to allow anything within the virtual network to access it – this can be modified at any time.

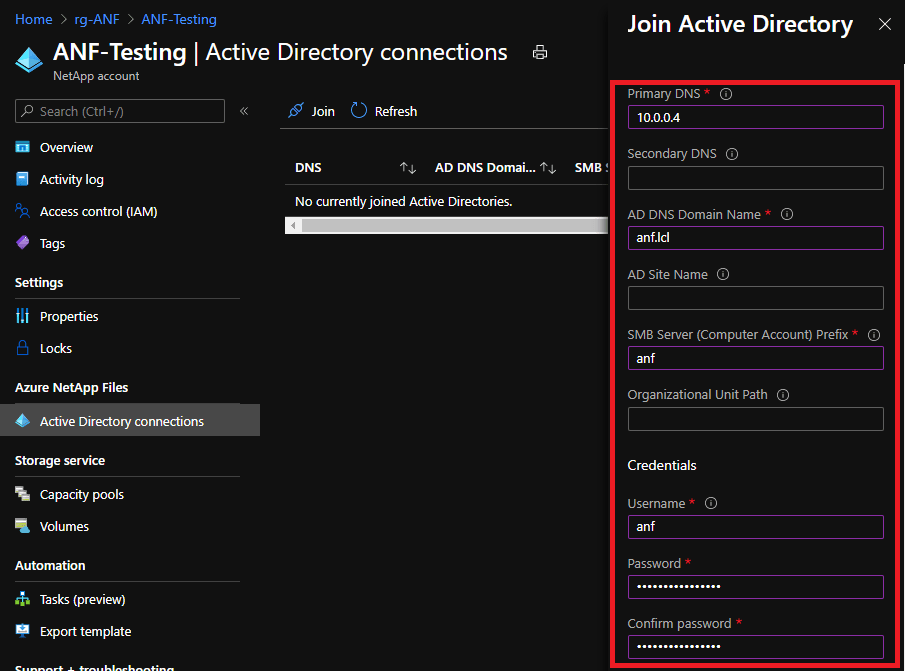
Alright, the NFS volume is all setup now and we’ll come back to that later to test on the Linux Client. Now I want to setup and SMB share, which first requires that I create a connection to Active Directory. I built mine manually in my lab, but you can also use this quickstart template to auto-deploy an Active Directory Domain for you . It’s also good to know that this source can either be traditional Active Directory Domain Services or the Azure AD Domain Services.
You will want to follow the instructions in the ANF documentation to make sure you have things setup correctly. I have my domain controller set to use a static IP of 10.0.0.4, named the domain “anf.lcl” and setup a user named “anf”. Now that this is complete, I can create the Active Directory Connection.
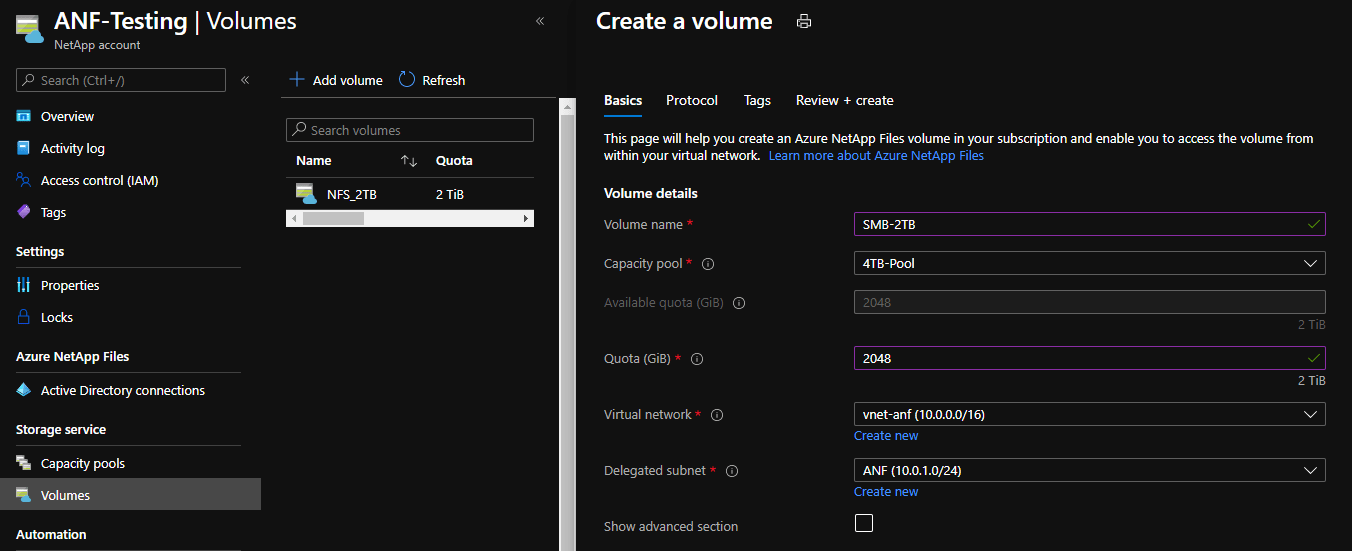
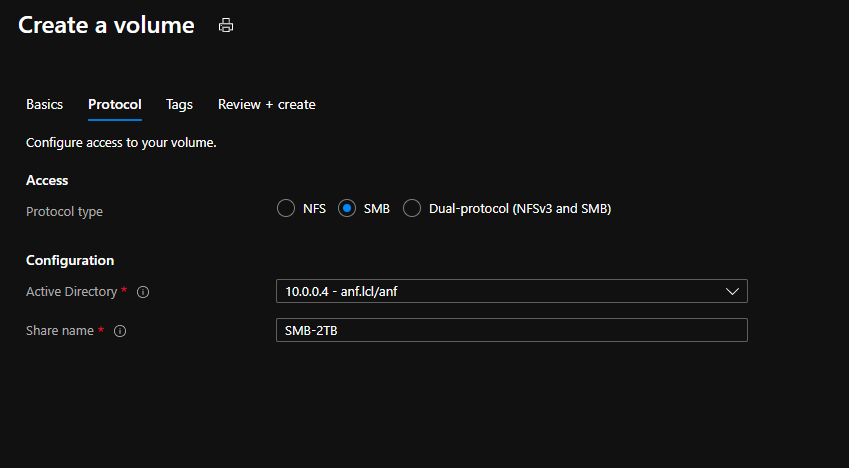
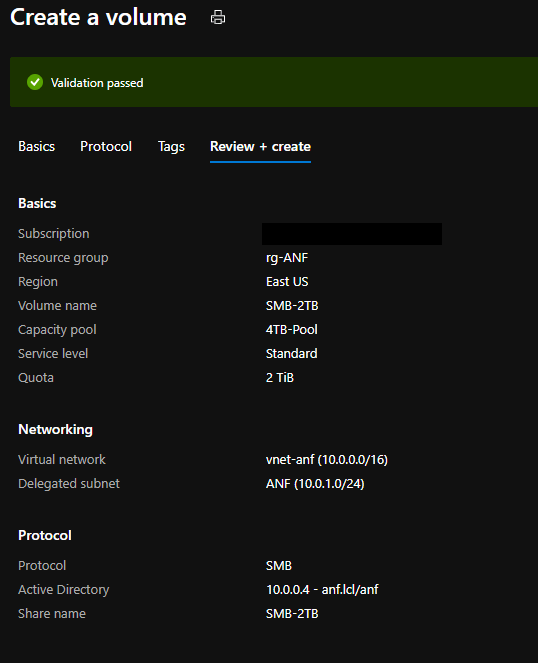
Great! Now that we have that configured, we can use the connection in setting up the SMB share. I’ll use the rest of the 4TB capacity pool here and use the Active Directory connection we just finished to create the SMB share.
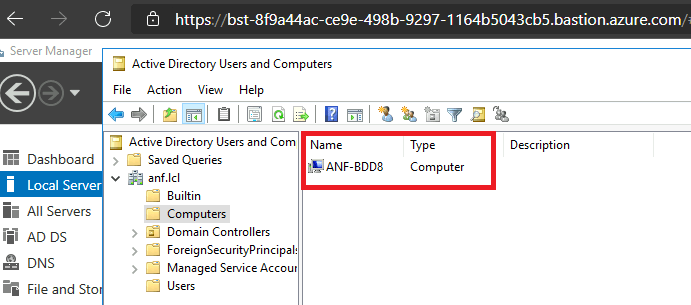
After this completes, you can jump into Active Directory and see that it creates a computer account in AD. This will be the “host” of the SMB share, and ANF will use this to verify credentials attempting to connect to the share.
Fantastic, now we have ANF created, with a 4TB capacity pool, a 2TB NFS share, a connection to Active Directory, and a 2TB SMB share. On the Volumes tab we can now see both of those shares are ready to go.

Each of the shares has a tab called “Mounting instructions”, I’m going to test the SMB share first so I’ll go grab this information. You can see the UNC path looks like an SMB share hosted by the computer “anf-bdd8.anf.local”, this is how other machines will reference the share to map it. Permission to this share can be controlled similar to how you would control them on any other Windows share, take a look at the docs to read more on how to do this.
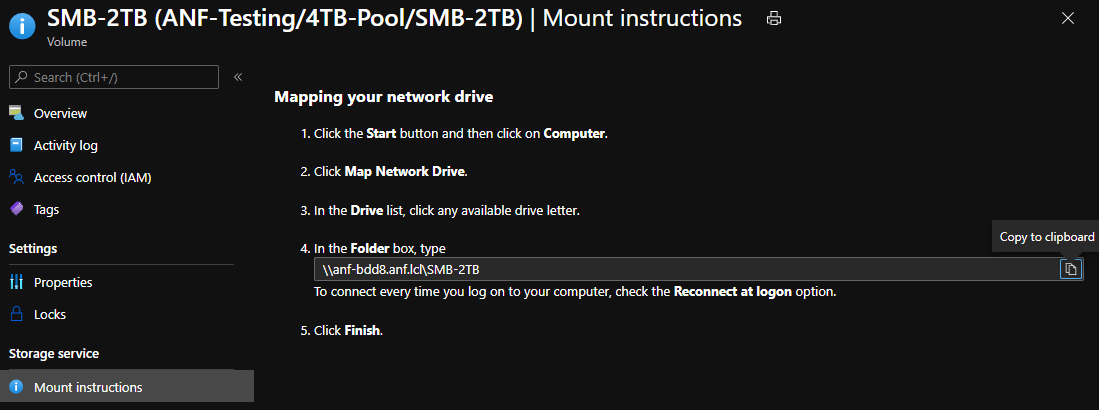
With this information we can go use the Azure Bastion connection to jump into our Windows Client and map the network drive.
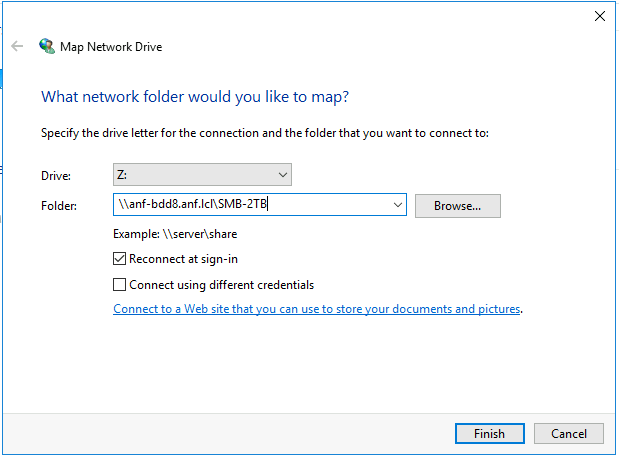

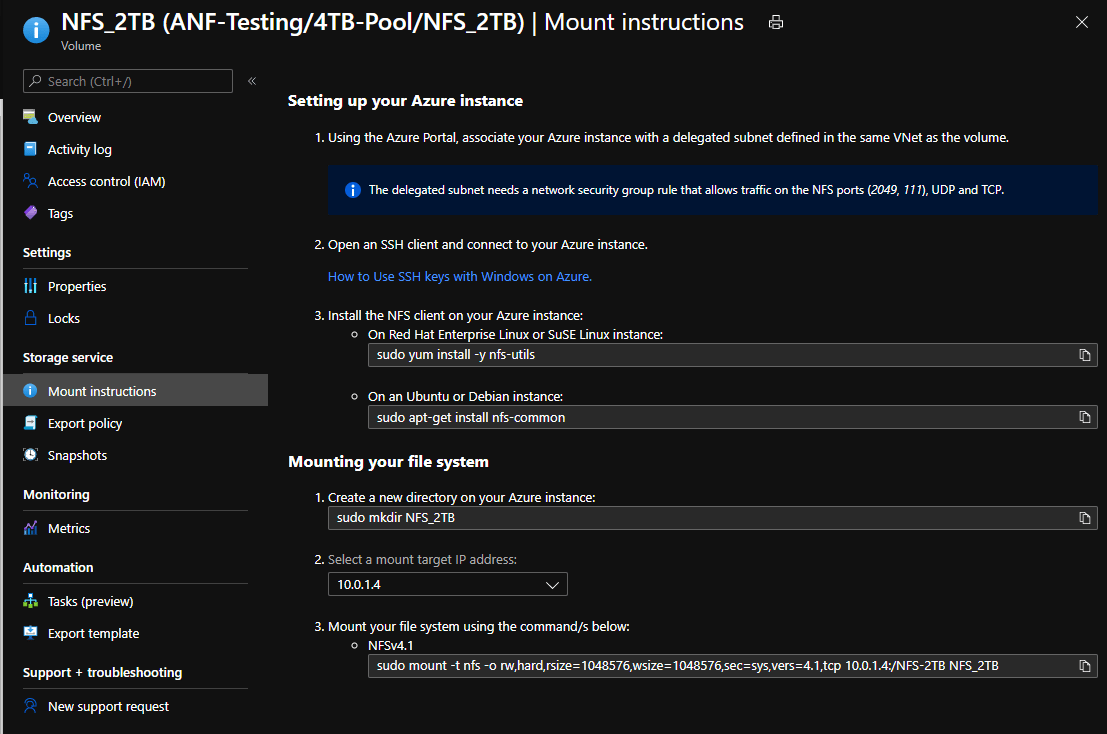
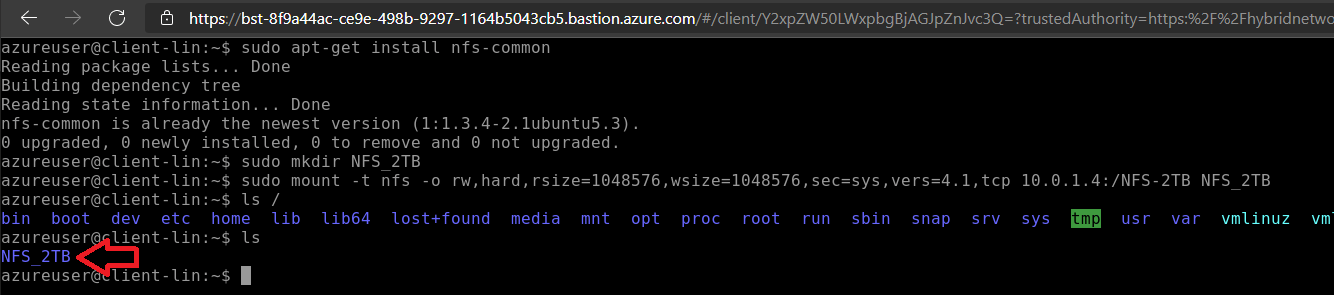
Voila! The Azure NetApp Files SMB share is mounted on our Windows Client. Now let’s go do the same thing with the NFS share: grab the mounting instructions, use the Azure Bastion Connection to connect to the Linux Client, and mount the NFS share.
Cost, Performance, Availability, and Limitations:
Performance:
As noted earlier, there are three service level tiers in Azure NetApp Files: Ultra, Premium, and Standard.
- Ultra provides up to 129 MiB/s of throughput per 1TiB of provisioned storage
- Premium: 64 MiB/s per 1 TiB
- Standard: 16 MiB/s per 1TiB
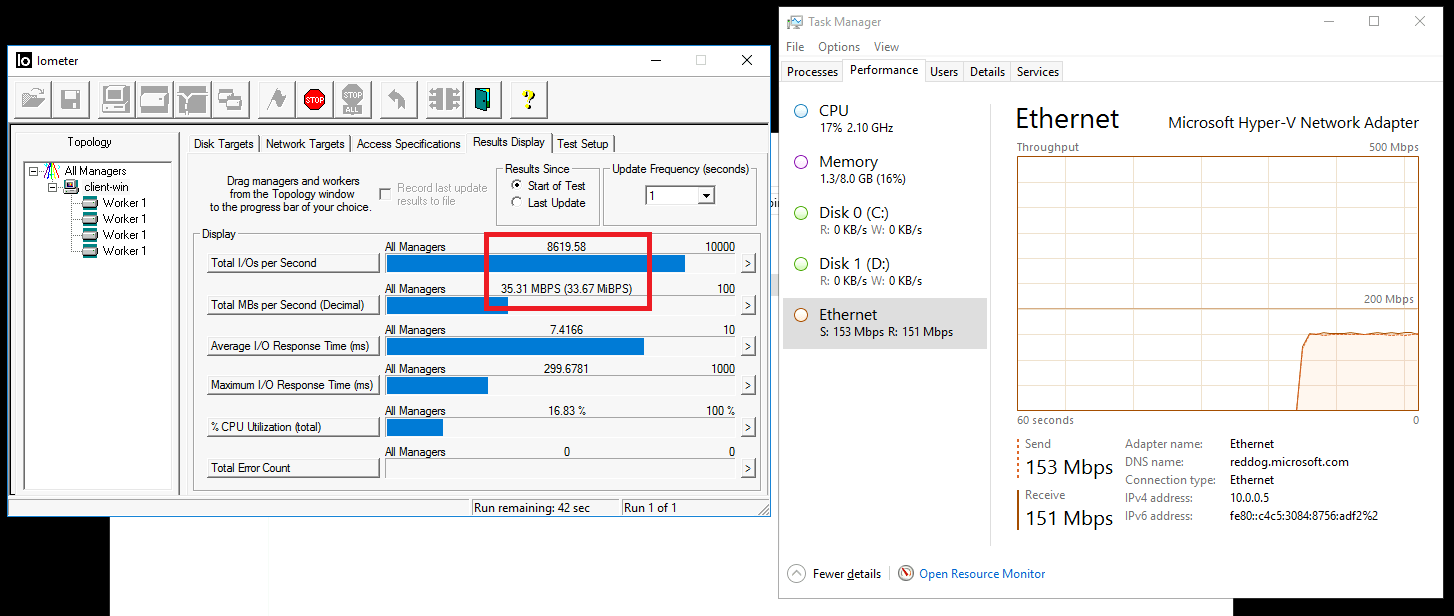
Remember that earlier I selected the standard (lowest performance tier) for my capacity pool, this tier is more designed for capacity situations than performance and is much more cost effective. With that said though, let’s do a quick performance test.
- 2TB SMB share on the “Standard” tier
- D2s_v3 Windows Client
- IOMeter tool running 4 worker nodes, with a 50% read 4Kb test
The performance capabilities of ANF are a combination of 3 main things:
- Performance Tier
- Volume Capacity
- Client Network Throughput
As I’ve mentioned in part 2 of this blog series, similar to managed disks, the performance of an ANF volume increases with its provisioned capacity. Also remember that Azure VM SKUs have an expected network throughput and this is important here because the storage in question is over the network. If the VM is only capable of 1,000 Mbps then depending on your I/O size, regardless of the ANF configuration, your tests will only ever perform at up to 1,000 Mbps.
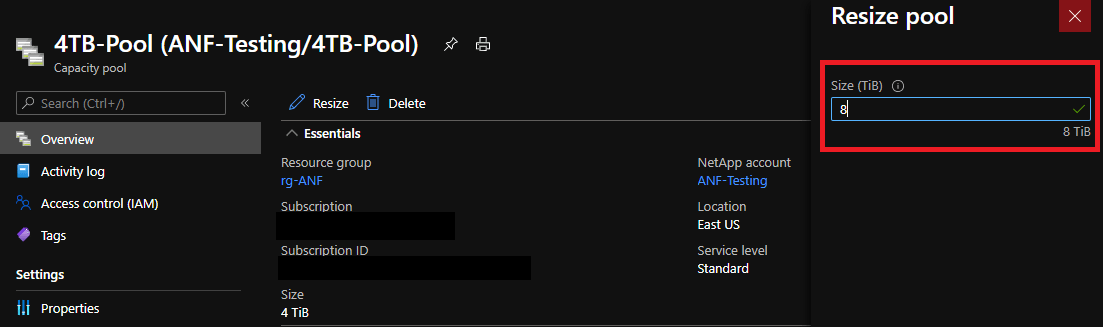
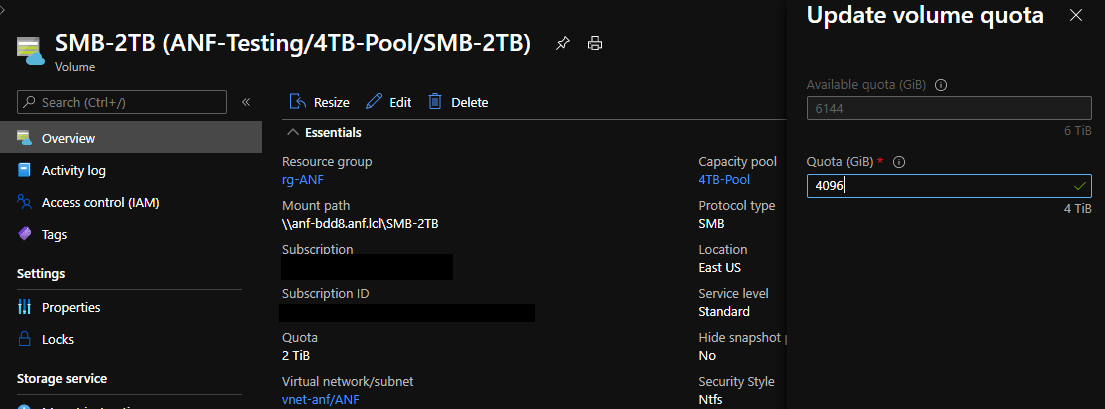
Just to verify that the performance is tied to capacity, I’m going to increase the capacity pool and then double the size of the SMB volume from 2TB to 4TB and run the test again.
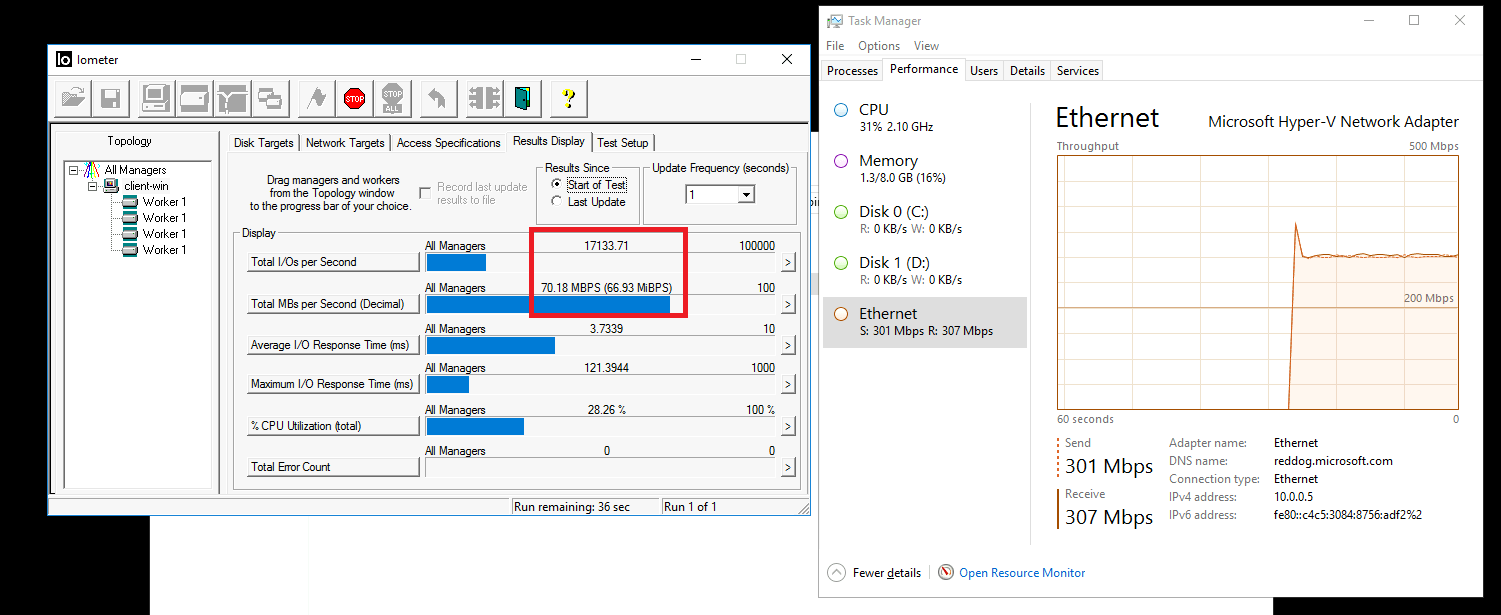
We can see that the performance roughly doubled, with no change inside the VM (since we’re not yet hitting the Network Bandwidth limitations of that VM SKU).
Now let’s run the same test using the FIO tool on our Linux Client against the NFS share.

Again we’ll go ahead and increase the capacity pool then double the size of the NFS share and run the test again.


Similar to the SMB testing, after doubling the size of the NFS share it also doubled its performance. Increases in capacity on the pool or volume can happen live, while the systems are running, with no impact.
As I mentioned earlier, I will be writing another blog post at a later time on performance benchmarking and tuning on ANF. In the meantime I recommend reading the ANF documentation on performance, for example this one on Linux Performance Benchmarking.
Availability:
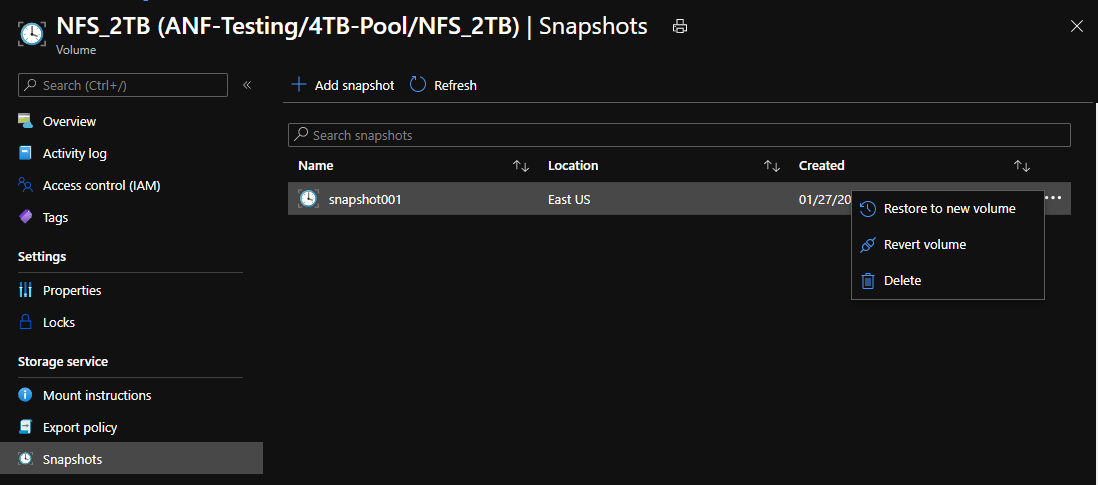
Similar to what you would expect with a traditional NetApp appliance, ANF does support the use of snapshots. Keep in mind that your snapshots will consume additional storage on your ANF volume.
As earlier noted, Azure NetApp Files is a true NetApp appliance running in an Azure Datacenter and is therefore subject to the same appliance-level availability. In addition, there is a 99.99% financially backed SLA on Azure NetApp Files.
Note: Cross-Region replication is currently in Public Preview so I won’t note it as an option yet, but will edit this post once it becomes generally available.
Cost:
Pricing for Azure NetApp Files is incredibly straightforward – you pay per GB x hours provisioned.
Currently Pricing ranges from $0.14746/GB to $0.39274/GB based on performance tier. Please see the pricing page for the most up-to-date information.
You can also see this documentation on Cost Modeling for Azure NetApp Files for a deeper dive into modeling costs on ANF.
Limitations:
- While ANF is rolling out to more and more regions, since it is discrete physical hardware it doesn’t exist everywhere (yet) and may impact your deployment considerations.
- ANF does not (yet) support availability zones.
- Additional resource limitations can be found here: Resource Limits for Azure NetApp Files.
Typical Use Cases:
The most common use case for Azure NetApp Files is simple, if you need more than 80k IOPS. Now, keep in mind that IOPS isn’t always straight forward. IOPS (Input Output Operations Per Second) can vary greatly based on the workload – data size, and access patterns. For example, a machine is likely to have significantly higher IOPS if the data size is 4Kb rather than 64Kb, if all else is constant, x16 times more IOPS. Similarly, throughput (eg. MBps/GBps) will be higher based on data size. With that said, if a workload requires incredibly high performance with an application that isn’t designed to run on cloud-native platforms (eg. Blob Storage APIs, etc.) – ANF is likely the place it will land. Remember that (as of the time of writing this, January 2021) the most uncached IOPS a machine can have in Azure is 80,000 (see Part 2 of this blog series).
This comes into play often with very large database systems such as Oracle.
- https://docs.microsoft.com/en-us/azure/azure-netapp-files/solutions-benefits-azure-netapp-files-oracle-database
- https://docs.microsoft.com/en-us/azure/azure-netapp-files/performance-oracle-single-volumes
Another typical use case is SAP HANA workloads.
- https://blog.netapp.com/azure-netapp-files-sap-shared-files/
- https://docs.microsoft.com/en-us/azure/virtual-machines/workloads/sap/sap-hana-scale-out-standby-netapp-files-rhel
The third most common workload for Azure Netapp Files that I’ve found is in large Windows Virtual Desktop deployments, using ANF for storing user profile data.
Pros and Cons:
Okay, here we go with the Pros and Cons for using an Azure NetApp Files for your shared storage configuration on Azure.
Pros:
- Incredibly high performance.
- SMB and NFS Shares both supported, with Kerberos and AD integration.
- More performance and capacity than is available on any single IaaS VM.
- ANF is a PaaS solution with no appliance maintenance overhead.
Cons:
- While it is deployed in most major regions, it may not be available where you need it yet (submit feedback if this is the case).
- Does not yet support Availability Zones, Cross-Region Replication is in Preview.
Alright, that’s it for Part 4 of this blog series – Shared Storage on Azure Storage Services. Please reach out to me in the comments, on LinkedIn, or Twitter with any questions about this post, the series, or anything else!
Shared Storage Options in Azure: Part 3 – Azure Storage Services « The Tech L33T
[…] Part 4: Azure NetApp Files […]
Shared Storage Options in Azure: Part 2 – IaaS Storage Server « The Tech L33T
[…] Part 4: Azure NetApp Files […]
Shared Storage Options in Azure: Part 1 – Azure Shared Disks « The Tech L33T
[…] Part 4: Azure NetApp Files […]
Shared Storage Options in Azure: Part 5 – Conclusion « The Tech L33T
[…] Part 4: Azure NetApp Files […]